August 2011
A weekend away in Yorkshire and another in Scotland limit available build time this month. Although we had a great time and sampled some nice Malt Whiskies.
After further investigation on the web, I find that there are special tools available for measuring Bump Steer, although these are quite expensive for the one or two times I will use it. Other people have had success with home made devices.
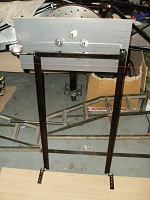
I set about making one using some angle iron, box section steel and a plunger type Dial Test Indicator that I have. The angle is secured to a piece of worktop using some more angle iron and bolts to effect a hinging mechanism. I buy a sheet of steel and drill holes in it for the hub stud spacing and glue it to a piece of plywood. A scale is drawn up one side indicating normal ride height and markings at half inch intervals for minus one inch (Drop) and plus three inches (Bump).
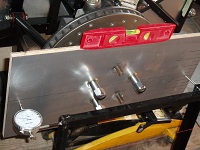
The bumpsteer guage has the dial test indicator at one side and a rounded post on the other. The whole assembly is hinged so it can move unrestricted towards or away from the wheel. With the wheel set at the normal ride height, the assembly is positioned so that it is level and parallel to the previously leveled plate mounted on the hub, the positioning must be so that the dial test indicator is depressed to around half way. This then gives both inward and outward movement of the plunger and thus positive and negative measurement. As the hub is raised and lowered, any deviation of toe in will cause the hub plate to turn in or out. This movement will be followed by the rounded post casuing the dial test indicator plunger to become more or less depressed and enable readings to be taken.
Using this with a jack under the wishbone is much easier than using my original idea of variable length ride height bars, this are put to one side (scrap box).
Adjusting the Bump Steer is a bit repetitive, adjusting one side tends to move the opposite side a small amount due to the rack pivoting around the mounting. So it is really a process of check/adjust/recheck – alternating on sides until the best readings are attained. Then reset the Toe in and recheck the Bump Steer.
In the photos below you can see with half inch of bump the dial guage has registered 0.5mm (half a revolution of the needled).


